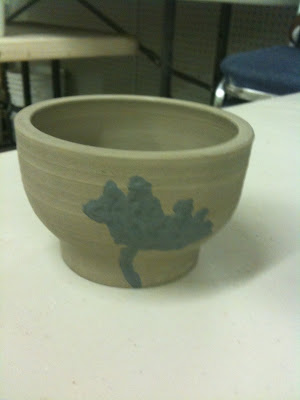
this might be the best thing I have ever made. I'm tempted to leave it at that, but for those of you who might just be left scratching your heads, I'll explain: when my friend John saw the inlay technique, he sent me and email saying he would pay "top dollar" for a mug with this on it:
so OF COURSE I had to do it.
it's 3.25 inches wide. if you include the handle, it's almost 5 inches. oh, and it's about 4.5 inches tall.
clear glaze over the outside, "ripe apple (aka blood) red" on the inside.
i'm obviously giving john first dibs on this one. but as usual, I can make more. and if he doesn't want it...
$30 (because I hate doing handles.)
S O L D (12.23.09). thanks, johnny!
happy holidays, everyone.
Dec 22, 2009
Dec 21, 2009
W I S H - P O T
as promised, here is another piece I did using slip inlay. just for kicks I had it on the table at my sale - as greenware. (that means it hadn't been fired yet, but was air-dry) and it sold! thanks, rocker, for having faith it would turn out. I could have ruined christmas...
I stuck with black inlay because I switched to a smoother clay (grogless g-mix in case anyone cares) and there just wasn't any other color option, though I had initially envisioned a dark brown design. despite the inlay being stupidly labor intensive, I really love the result. I think I'm going to have to limit myself to a couple per session though if I ever want to get anything else accomplished. I managed to eke out four items with inlay this term (each with increasing detail), but I did devote a day and a half to carving, filling and scraping and ignoring things like eating, drinking and going to the bathroom.
this little pot is just about 4.25 inches across at its widest x 3 inches in height. it has pistachio glaze on the inside which turned out to be quite subtle. I stuck with just clear glossy glaze on the outside so the design would show to its maximum. we're all about full potential here!
wheel-thrown and signed, november 2009
$ - I won't list the price since it's a gift
S O L D (12.08.09)
S L I P - I N L A Y
WARNING: these pictures are crap. I considered not sharing them at all, but then I thought perhaps you have a right to see how things went; I left you hanging there, didn't I? so, here are my photos of how the slip inlay technique turned out.
photo 1, lazy attempt at documentation using camera phone at my desk:
photo 2, guilty attempt with point and shoot at light booth, after realizing desk shot was just not going to cut it:
photo 3, an attempt at detail shot:
these poorly lit shots are only of the bowl, but the vase version turned out just as sweet. all in all, I am super excited about how they turned out. in fact, when I brought them into work to take photos of them, they were quickly snapped up by eager customers (aka: co-workers). so I made more with the inlay technique. stay tuned for photos of those. maybe tomorrow.
Dec 8, 2009
S A L E
today I had a huge sale. I put everything I had lying around (including stuff that was laying around my house) and took it to work. in december, we often have people sitting at a big table in the atrium of our building, hocking their wares. so I figured it was worth a shot. plus, I had a backlog of things that hadn't sold. or stuff that I hadn't even TRIED selling.
being that I was too embarrassed to sit out there by myself, I suckered my friends sam, sef and tram into bringing stuff too. sam paints. sef draws. and tram, well, she and her husband have made these amazing plant pots... they'll be featured in dwell magazine in april if that tells you anything.
here's the flyer so you can see samples. (click to enlarge)
I'm updating all the old posts here with what's now sold. which is quite a bit, actually. AND I have to say I am quite pleased with myself. at least in dollar amounts. ha!
hopefully I'll have other stuff on here soon too. thank you to everyone who bought something. you're the bestest. and for whoever took some of the super balls out of the ruffles bowl, that was weird.
Sep 24, 2009
S E T B A C K S - A N D - P R O G R E S S
pottery has started back up! but I missed the first class due to a schedule change, then there was this:
this was taken this morning, a week and a day after the initial incident where my thumb and an x-acto knife got in a MUUUUCH too close conversation. I'm fine. no stitches (just some glue), but it's healing very slowly and well, has put a damper on throwing. luckily I had 4 pieces thrown before this happened, so I got to experiment a little with something new: slip inlay. basically what you do is this:
1. you throw a pot
2. you let it dry and become "leather-hard"
3. you trim the bottom, like normal
4. then you carve on it. whatever you want.
5. you then cover the carving with clay which has been thinned out (so you can paint it on) and stained different colors.
6. you then carefully scrape away the extra clay to reveal the design, sitting nice and snug in your carving.
here's a few pics of my work in progress. I can't wait to see these done. I might be hooked on this process.
step 5. covered with colored slip (this will end up black after firing):
after step 6 (same design on this piece as bowl in last pic):
close up of scraped piece:
Jul 16, 2009
M A R B L E I Z I N G
when I was a kid, my stepdad had a 1973 chevrolet monte carlo. royal blue. it was a well-used car, and through the years, it eventually rusted out in spots. due to coastal living, my stepfather also often lost the battle to keep his car clean to the local seagulls. we knew he had given up all hope when one day he grabbed a can of spray paint (blue) and sprayed over the um, problem areas. this method of car care lasted longer than most of the rest of the family would have liked, and several shades of blue spray paint were eventually applied. we affectionately called the method "marbleizing."
in that vein, I'd like to show you a nice little set. is something a little different for me, in that I mixed two different colors of clay together and then threw with them. so the brown you see is dark clay, and the creamy color is light clay. there's no royal blue, or just blue, but hindsight is 20/20 isn't it?
the cups are actually a good size for tea, and the bottle is probably good size for creamer (if you take your tea that way). or, sake. it would make a great sake pitcher.
the cups are both 1.75 inches tall x 3 to 3.25 inches in diameter. the little pitcher is 3.5 inches high x about 3 inches at its widest.
this set because of the marble effect, I covered the outsides of all of them in clear glaze, then put a new glaze inside. well, the glaze is new to me. I was looking for a nice orange, but couldn't find one, so I settled on trying one called "wonder red." it really came out more like a flesh tone. kind of like someone blushing. in fact, I think the entire set reminds me of skin tones. I could name the set "study in nude," if I were that much of a dork. luckily I am NOT.
wheel-thrown and signed, february 2009
$40 for the set
S O L D (12.08.09)
Jun 29, 2009
S Q U A T - B O T T L E - V A S E
in latte
hi. I intended to post at least once a week in my time off from actually making my pottery. clearly it has turned into once a month and my grasp on being one of those Impressive People Who Get Things Done, or Someone Who Accomplishes Things is slowly slipping, and I am now Someone Who Accomplished Things in February 2009.
>sigh<>it was done in latte glaze, which makes both the lighter color and the rust color, depending on how thick/thin you apply it. I thought the dark color would make the grooves stand out a bit more. and they do.
wheel-thrown and signed, february 2009
$15
S O L D (12.08.09)
Jun 1, 2009
E X P E R I M E N T
when I was learning the technique of brushing another, darker slip onto the outside of a pot for the crackle effect, I did an experiment. (let me know how you think it turned out; I still haven't made up my mind.)
I threw this bowl, and painted on a very thick, uneven coat of "raisin" colored slip on the outside. I then poked holes around the top of the bowl, large enough to poke stuff through. I was thinking about ribbon or leather. being that the final effect was a rather raw, rough one, I opted for the leather over the ribbon. ribbon just didn't go (and I'm all about harmony...)
approximately 2.5 inches tall x 6 inches in diameter.
transparent glaze over the entire thing. no colors added, just clay color. the slight whitish/blueish color on the outside is where the clear glaze pooled up.
wheel-thrown and signed, december 2007
$15
SOLD (12.08.09)
May 28, 2009
R E D - C R A C K L E - V A S E
since you've now seen (hopefully) my two crackle bowls in the WK MAKE show, here's another little crackle number.
this little vase is just taller than 3.5 inches tall x 2.75 inches in diameter.
unlike the bowls in the make show, this one is done with glazes, not two colors of clay. so I made the whole thing with one clay color, then made the crackle effect, then glazed. I used a red underglaze on the cracks and on the inside. I then applied celadon glaze over the outside.
wheel-thrown and signed, december 2007
$10
S O L D (12.08.09)
May 15, 2009
I D E A
no new work right now (getting photos taken), but I thought this was a really cool idea:
more on how to do this here :
http://www.apartmenttherapy.com/boston/how-to-hang-a-wall-of-handmade-ceramic-bowls-084738
more on how to do this here :
http://www.apartmenttherapy.com/boston/how-to-hang-a-wall-of-handmade-ceramic-bowls-084738
May 7, 2009
W K M A K E . C O M - I S - L I V E
if you don't want to sort through to find my bowls, here's the direct link:
http://wkmake.com/#/21
fun stuff!
http://wkmake.com/#/21
fun stuff!
May 4, 2009
S H O W
omg, I am going to be in a show! well, not ME, but two of my pieces:
my company has organized a global art show showcasing the talents of people in the company at all our various offices. they have taken photos of each item, and are listing them all on a website:
http://wkmake.com/
additionally, they will be viewable IN PERSON if you can make it to portland on thursday may 7 at 6-10 pm (pacific standard time)... well, I'll just let you read the invite.
so... log on thursday night to see!
Apr 29, 2009
C E L A D O N - D I S H
I have been thinking recently that I need to make my cat a new dish. he broke his... with love. or so I like to think. he actually broke it by licking it clean, right off the counter, so perhaps that's true; he loved that wet food too much. the verdict is out whether or not I will use this one; it's the right size, but the old corian® plate I am using will produce less disappointment when it gets shattered on the kitchen floor. (or, it will just bounce.)
if you like to feed your cat in less precarious places than tall counters, perhaps this is meant for your furry friend. or maybe it's just meant for m&m's. yummy, yummy m&m's.
just under 4.5 inches in diameter x 2 inches tall
celadon glaze
wheel-thrown and signed, february 2007
$15 (if you buy it and really intend to use it for a cat, maybe you'll find a special treat in there for your feline too.)
Apr 27, 2009
T I N Y - V A S E S
a set.
these two vases are tiny. okay, they aren't really miniatures or anything, but they are pretty darn small. sure, you can fit a few flowers in them, but they have to be of the small variety. like dandelion size. it's possible I made these before I made a sake set. you know, for practice.
the small vase is 2 inches high x just over 2.5 inches across.
the "tall" vase is slightly over 3 inches high x about 2.5 inches in diameter.
I put a slight texture on the tops and glazed them pistachio green over eggshell wash (matte white) glaze. it's VERY subtle in person.
both of these are wheel-thrown, signed and dated, may 2007
$20 for the set
S O L D (04.29.09)
Apr 20, 2009
s l a c k i n g
I am such a slacker. actually, if you could hear me it would be worse. I'm whining under my breath about the batch of photos I've been posting from; they take a fair bit of retouching to get the colors adjusted. no offense to chris; they're great detail shots; we just had no idea how to light them. so that is partially why the holdup in getting new stuff posted. also, I'm obsessing about my yard now. that's fair warning; I might actually start posting yard before and after pics. heh.
tonight is the last night of pottery class before I take the summer off. but I will continue to post what pieces I have made in the past, and of course sell them.
I'll post work tomorrow. I swear.
tonight is the last night of pottery class before I take the summer off. but I will continue to post what pieces I have made in the past, and of course sell them.
I'll post work tomorrow. I swear.
Apr 10, 2009
L A U R I E ' S - B O W L
I gave this bowl to my father-in-law's girlfriend last xmas. her name is laurie. hence, the name.
unfortunately, I neglected to take any measurements of it before I sent it off to its new home. but from what I remember, it was about 5 or 6 inches in diameter and oh, let's say 3.5 inches tall.
I used chocolate brown underglaze for the outside. it was a thin-ish coat, which is why the clay shows through at the top. inside, I used shiny turquoise glaze. I just love that color. there's a close-up shot so you can really see it.
wheel-thrown, and signed. I know it's dated too, but I can't recall when.
S O L D – okay, gifted... (12.25.09)
Apr 9, 2009
R E E D - V A S E
this vase was meant to look a little more natural (less controlled and modern looking) than my normal stuff.
okay, I have to admit it: I did it that way because just as I took the vase off the wheel - still wet - I accidentally scraped the side of it with my fingernail. fingernails are totally your enemy in pottery. you have to keep them cut super short or you end up with divots in pretty much everything you do. so when faced with an irreparable gash in the side, I decided to embrace it and MAKE MORE! so it turned into an interpretation of grass blowing in the wind. (cheesy, I know, but it worked so I went with it.)
the measurements of this piece are: 3.5 inches across at the base, 2 inches at the top x 5.75 inches high.
I did the inside and the lip in chocolate brown underglaze. I put iron oxide on the outside to bring out the texture and then glazed it in celadon.
wheel-thrown, signed and dated, april 2007
$20
S O L D (04.29.09)
Subscribe to:
Posts (Atom)